Hi… I’m Carole Anne Patterson and I love crafts, sewing, and creating quilts. I’m a longarmer who loves making quilts come to life.

caroleanne@icraft.cards

ca@fabric-paper-scissors.com

caroleanne_icraft.cards

Sneak Peek – Let Hope Be Your Lighthouse – High Tide

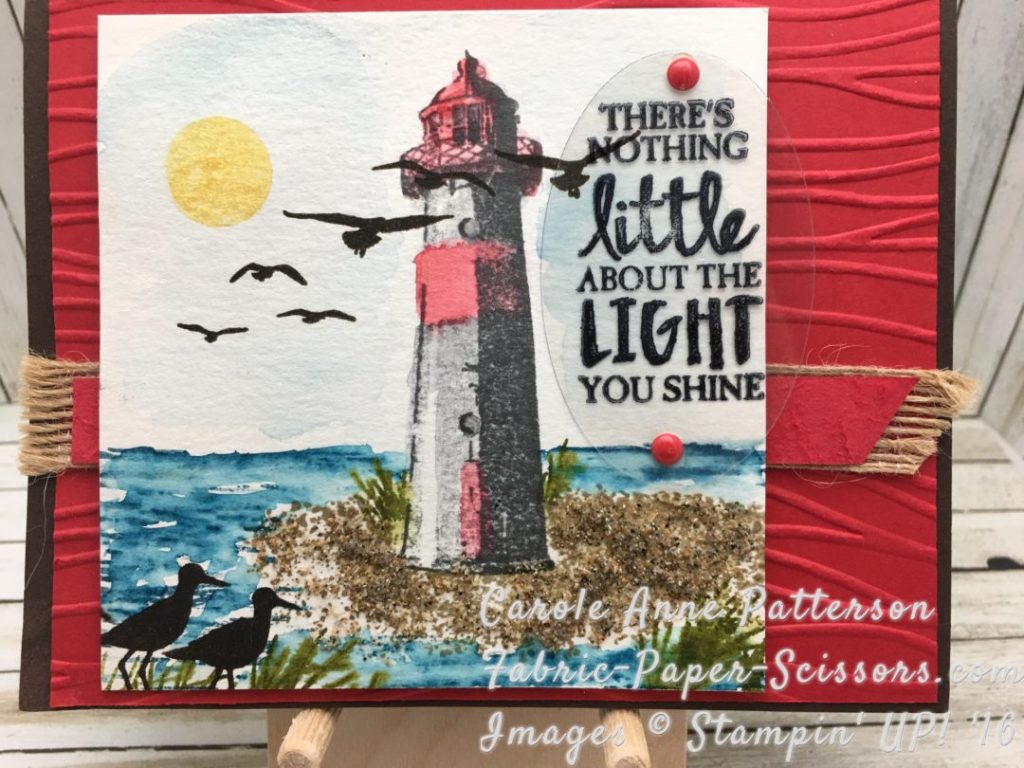
Lighthouses don’t go running all over an island looking for boats to save–they just stand there shining.

The NEW Occasions Catalog features this gorgeous stamp set called HIGH TIDE. I had the privilege and honor to debut this set at OnStage Phoenix last week. I didn’t know what set I would be receiving when I submitted my work for a chance to present AND when I received this set I couldn’t believe my eyes. I’m from the Maritime Province of Nova Scotia and grew up on Cape Breton Island – It’s a piece of heaven there, you really must visit. I live in Northern California now and we have beautiful lighthouses here as well…just a different ocean.  Anyway, I grew up around lighthouses, they are a fixture when you live in the Maritimes and I absolutely love them and I love this let. Lighthouses are traditionally red and white, I know because I researched, there is a black and white lighthouse somewhere but mostly ALL are red and white. I think that you can take creative license when you are stamping to change the colors up a bit as you will see further along in the post.

I have so many cards to share which I’ve created with this stamp set and this first card I didn’t bring to Phoenix but I wanted to share it with you. It’s a Shaker Card…guess what’s inside? Well, it’s those little silica balls that come in packages, they along with a few flakes of mica represent the stormy seas as indicated in the sentiment.

High Tide - Sneak Peek
High Tide – Sneak Peek


High Tide - Sneak Peek
High Tide – Sneak Peek – a
High Tide - Sneak Peek
High Tide – Sneak Peek – b


The ribbon in (b) is sueded paper, yes that’s what I’m calling it. Take a little piece of cardstock, break the fibers down by going back and forth with a bone folder – use your finger on the top to hold the cardstock and the bone folder on the bottom. When the fibers are sufficiently broken down, it should come apart easily into two pieces. The inside feels like suede and looks lovely on a card.

The Foam Adhesive strips and Window Sheets make it so easy to make shaker cards now. That sounds like a good reason to make a Shaker Card Video…that will be coming up soon!

On to more previews of this gorgeous stamp set…

Watercolor with real California Beach Sand
Closer look at the California Beach Sand


I used the Seaside Textured Impressions Embossing Folder on the Real Red Cardstock. I mixed the sand with white glue until the texture met my approval, then I used the small sand stamp to place it over the already stamped sand. I’ll put up full instructions in another post.

Mariner's Decor Piece with High Tide - Sneak Peek
Mariner’s Decor Piece with High Tide – Sneak Peek
High Tide - Sneak Peek
High Tide – Sneak Peek – Sentiment in Stazon on Window Sheet
High Tide - Sand
High Tide – Sand


img_1352-2
High Tide – Sneak Peek – Simple Watercolor, Stazon on Window Sheet, Marina Mist mat, Crumb Cake card


High Tide - Sneak Peek Emboss Resist. Tip Top Taupe and Pool Party
High Tide – Sneak Peek Emboss Resist. Tip Top Taupe and Pool Party
High Tide - Sneak Peek Copper Embossiing on Night of Navy
High Tide – Sneak Peek Copper Embossiing on Night of Navy
High Tide - Sneak Peek Watercolor Night Sky at Sunset
High Tide – Sneak Peek Watercolor Night Sky at Sunset


High Tide - Sneak Peek - Glassine Party bags embossed with Seaside Textured Embossing Folder
High Tide – Sneak Peek – Glassine Party bags embossed with Seaside Textured Embossing Folder
High Tide - Sneak Peek - It's a Party! By the Shore DSP, Marquee Messages, Clear Embossing Powder with Classic Stampin Pad
High Tide – Sneak Peek – It’s a Party! By the Shore DSP, Marquee Messages, Clear Embossing Powder with Classic Stampin Pad
High Tide - Sneak Peek - Birthday Card using Serene Scenery DSP
High Tide – Sneak Peek – Birthday Card using Serene Scenery DSP


High Tide - Sneak Peek - These turned out gorgeous! Archival Grey stamped on ceramic tiles from a home store. Sealed with Mod Podge Matte and sprayed with clear sealer.
High Tide – Sneak Peek – These turned out gorgeous! Archival Grey stamped on ceramic tiles from a home store. Sealed with Mod Podge Matte and sprayed with clear sealer.
Colorful Lighthouses with Paisley Framelit for wave
  1. So easy, use a piece of Shimmering White Cardstock, stamp in four colors  – I did mine in Watermelon Wonder, Emerald Envy, Sweet Sugarplum and Dapper Denim. This is two-step stamping so be sure to stamp off the first image after you ink it, then stamp the detailed lighthouse full strength.
  2. Wash a little Soft Sky around the lighthouses.
  3. The life preserver is made using two round punches, 3/4″ and 1/2″. Put a glue dot on the frame and wind Night of Navy Solid Baker’s Twine around. Then bring in a little Whisper White Solid Baker’s Twine to make finish the life preserver.
  4. Take a piece of Night of Navy Baker’s Twine, put a few knots in it to make it look like rope.
  5. Attach a piece of Burlap Ribbon to the card by putting down a strip of Fast Fuse, scrunch the ribbon along the Fast Fuse.
  6. Attach the Night of Navy Baker’s Twine to the Burlap Ribbon, use a few squished up Glue Dots to Secure.
  7. Stamp the sentiment on a scrap of Shimmering White Cardstock with Night of Navy Ink, quickly sprinkle with Clear Embossing Powder and emboss with the Heat Tool
  8. Die cut with Paisley Framelits Dies. It either looks like a wave or you could make it a whale…hahaha!
  9. Use a sponge dauber and color in the wave. Attach with Dimensionals to the card.
  10. Make sure the inside has a sentiment and stamp something from High Tide inside.
  11. Don’t forget to decorate that lighthouse!!!

Remember this set isn’t available to customers until January 4th, 2017 so bookmark this or just remember to search for High Tide on my BLOG.

Stay tuned for ALL of the instructions!!! I would love to be your Demonstrator or click here for JOIN MY TEAM. I love Stampin’ UP! and you will too!  Email me at ca@fabric-paper-scissors.com with any questions.

Happy Stamping!

Hugs from me…Carole Anne


Comments

17 responses to “Sneak Peek – Let Hope Be Your Lighthouse – High Tide”

  1. Rosemarie S. Avatar
    Rosemarie S.

    hi there from Pictou!! i am beyond excited to see this set haha. thx for sharing.

    1. Carole Anne Patterson Avatar
      Carole Anne Patterson

      So, I love lighthouses and grew up with them just like you! I went crazy when the stamp set was shipped to me because it was a total surprise. I did wonder what I was going to create but then the ideas came. I just love the whole stamp set. Get it!!! You’ll be able to craft up a storm for craft shows and gifts in Nova Scotia. I love Pictou…and miss the Maritimes so much! I was just home a few months ago but it’s never long enough.

    2. Carole Anne Patterson Avatar
      Carole Anne Patterson

      I miss home so very much! Thanks for commenting.

  2. Karee Abbott Avatar
    Karee Abbott

    These are all gorgeous! Thank you for both sharing them and inspiring our own creativity. On the tiles, you mentioned that they were sealed in matte modge podge and sprayed with a clear sealer….does that mean you sealed it fiorst with modge podge, then stamped the image and then sealed with clear sealer. Did you have to heat set your ink? Any more details that you are willing to share would be appreciated! Thank you!

    1. Carole Anne Patterson Avatar
      Carole Anne Patterson

      After I stamped them with Archival Grey Ink by Stampin’ UP!, I let them cure in the air for a day, then sealed them with mod podge, left them for a day and then spray sealed them with clear. No heat set needed, just air dry. If you are in the US, I just ordered tiles from Blick at dickblick.com and the shipping was inexpensive.

      1. Vicks craft Avatar
        Vicks craft

        Hi. Just wondering what size tiles you got as I would love to do something like this in a class

      2. Carole Anne Patterson Avatar
        Carole Anne Patterson

        Hi Vickie. The tiles are 4 x 4″ and the ones I just received from BLICK are just slightly larger.

  3. Lori Avatar
    Lori

    Absolutely breath-taking!

    1. Carole Anne Patterson Avatar
      Carole Anne Patterson

      Thank you Lori!

  4. Lisa Malone Avatar
    Lisa Malone

    Gorgeous cards!!! Do you have any videos of creating the one in the blue frame? Looks like you used markers? Or watercolor pencils? And in Watercolor paper?

    1. Carole Anne Patterson Avatar
      Carole Anne Patterson

      Lisa, not sure if I answered this but I’ll be making a video after the holidays are over and my high schoolers are back to school. I didn’t have the watercolor pencils so I used the Stampin’ Up ink pads and the Aqua Painters. I did use watercolor paper. There’s a video of the frame on my YouTube channel youtube.com/c/CaroleAnnePatterson Sign up for my Newsletter and you’ll know when I get things up and running. Thanks for the interest!

  5. Dawn Teague Avatar
    Dawn Teague

    Your cards are beautiful!! I would love to see a tutorial. :o)

    1. Carole Anne Patterson Avatar
      Carole Anne Patterson

      It’s coming…I promise! The write up is complete and I’ll be posting by next week – February 27th

  6. Traci Davis Avatar
    Traci Davis

    Hi Kylie:

    If you spray your stamped tiles with a poly coat, will they absorb condensation from a glass? Yours are beautiful, thanks for sharing.

    1. Carole Anne Patterson Avatar
      Carole Anne Patterson

      Mine did not absorb condensation from the glass…it sat on top of them and I just wipe it off. I put cork on the bottoms of all the coasters.

  7. Cathi Hester Avatar

    Hi Carole Anne
    I am impressed with the coasters and would love to case. I have tried to do them but the ink would not adhere. I tried Stazon on a flat nonporus matte finish. What kind of tiles did you use (porous or flat)? So baking was not involved? Every photopolymer stamp set I tried using would not adhere.
    We love the Maritimes and as my husband is a lover of lighthouses, we have seen nearly everyone, I think, from down east, except Nfld. (I am from Ontario). Your projects are all beautiful btw. Thanks for any suggestions you can offer.

    1. Carole Anne Patterson Avatar
      Carole Anne Patterson

      Hi Cathy. Thank you for the compliment. I know that you are in Canada but if you go to the US website dickblick.com and search for tiles, you’ll find the tiles I used. They are inexpensive.
      https://www.dickblick.com/products/laguna-ceramic-bisque-tiles/
      I suggest wiping them with alcohol and let them dry. I used Stazon. Hope this helps.

Leave a reply to Rosemarie S. Cancel reply